Customizing Font Properties for Print in HTML/CSS
When preparing HTML documents for print, you can customize the font through the separate properties:
Font Property Basics
font-family: Defines the font type used.font-size: Specifies the size of the font.text-rendering: Controls how text is rendered.letter-spacing: Adjusts the spacing between letters.
Setting Font Family
The font-family property in CSS allows you to specify the typeface used in your HTML document. It's important to choose a font that is legible and suitable for print.
CSS for setting font family
body {
  font-family: Arial, sans-serif;
}
In this example, Arial is the primary font, with a generic sans-serif as a fallback.
To set a custom font that's not available by default, see importing fonts through Google Fonts or Manual Import.
Adjusting Font Size
For print, font size matters greatly. The font-size property lets you control this aspect, ensuring that your text is neither too small nor too large. The following code will set the font size of paragraphs (<p> tags) to be 24 points.
CSS for adjusting font size
p {
  font-size: 24pt;
}
In place of pt, you can also use other units of measurement, such as px or em.
Bold text
To bold text using CSS, you can use the font-weight property.
CSS for bolding text
h1 {
  font-weight: bold;
}
This will set the font weight of all <h1> tags to bold.
Alternatively, you can also use the <b> or <strong> tags to bold text in HTML.
HTML for bolding text
The lazy <b>dog</b> jumped over the brown <strong>fox</strong>.

Italicized Text
You can apply italics to text using the font-style property.
CSS for italicizing text
h2 {
  font-style: italic;
}
This will set the font style of all <h2> tags to italic.
Alternatively, you can also use the <i> or <em> tags to italicize text in HTML.
HTML for italicizing text
The lazy <i>dog</i> jumped over the brown <em>fox</em>.

Underlined Text
You can underline text using the text-decoration property.
CSS for underlining text
h3 {
  text-decoration: underline;
}
This will set the text decoration of all <h3> tags to underline.
Alternatively, you can also use the <u> tag to underline text in HTML.
HTML for underlining text
The lazy <u>dog</u> jumped over the brown fox.

Text Rendering
The text-rendering property in CSS provides hints to the browser about how to optimize text rendering. It can take the following values:
auto: The browser makes trade-offs between speed, legibility, and geometric precision.optimizeSpeed: The browser emphasizes rendering speed over legibility and geometric precision. This can be useful in situations where speed is critical, such as rendering large amounts of text.optimizeLegibility: The browser emphasizes legibility over rendering speed and geometric precision. This can be useful in situations where legibility is particularly important, such as in printed documents.geometricPrecision: The browser emphasizes geometric precision over rendering speed and legibility. This can be useful in situations where precise geometry is important, such as when rendering text along a path.
Here's an example of how to use the text-rendering property:
CSS for text rendering
body {
  text-rendering: optimizeLegibility;
}
It's recommended to set the text-rendering property to optimizeLegibility, which means the browser will prioritize legibility over speed and geometric precision. This can help improve the readability of your text in printed documents.
Letter Spacing
The letter-spacing property in CSS allows you to control the space between letters. This can be used to improve the readability of your text or to achieve a certain aesthetic effect. Here's an example:
CSS for letter spacing
body {
  letter-spacing: 2px;
}
In this example, a space of 2 pixels is added between each letter. You can adjust this value to suit your needs.
Remember, the goal of adjusting these properties is to enhance the readability and aesthetic appeal of your printed materials.
Using Custom Fonts (Google Fonts)
Google Fonts offers a vast collection of web fonts that can also be used for print purposes. Integrating Google Fonts requires importing the chosen font through a link in your HTML and then applying it via CSS.
Example with Google Font 'Roboto'
CSS for using Google Fonts
@import url('https://fonts.googleapis.com/css2?family=Roboto&display=swap');

body {
  font-family: 'Roboto', sans-serif;
}
Overall, the process is the same as if you were using Google Fonts for a normal website. For more information, see Getting Started with Google Fonts.
Using Custom Fonts (Manual Import)
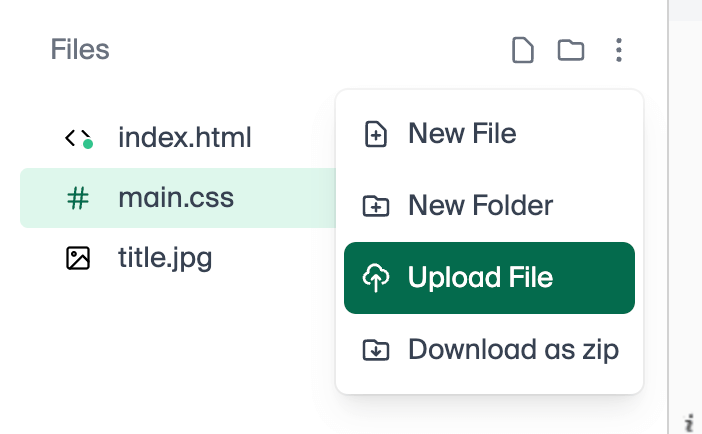
Using our editor, you can manually upload a font to your project using the following dropdown.
You can then import the font in your CSS and apply it to your document.
CSS for implementing custom fonts
@font-face {
  font-family: 'MyCustomFont';
  src: url('path/to/font.woff');
}

body {
  font-family: 'MyCustomFont', sans-serif;
}
Ensure your custom fonts are appropriately licensed for print use.
Conclusion
In conclusion, setting font properties for print in HTML/CSS is a critical step in creating professional-looking documents. By choosing the right fonts and styles, you can significantly enhance the readability and aesthetic appeal of your printed materials.